Friday, 17 December 2010

Mission to Mars in more detail

I'm going to assume that you're confident at running a Mission to Mars (or Fastrack) game. Whilst playing about with settings I have discovered a number of other options that may help you.


The timer function
First of all if you select the timer function on the setup menu the following section will be added to you tool bar. You have the option of giving the same time allocation for every question, or by using the time that you have set for each question when writing your slides.
Once the timer has counted down players will no longer be able to submit an answer. It is possibel to reduce/increse time during play by clicking on the -/+ symbols. You may also click on the number to pause/play the timer (it greys out when paused).


The menu
If you right-click on the tool bar a list of options comes up as shown below:


 Settings
Clicking on settings will bring up a list of settings very similar to the ones at setup:
You may wish to remove the timer for example, or if you class are shouting out answers you could remove the 'show feedback' option on their remotes. Be very careful that you don't accidently remove the 'Mission to Mars' presentation.


 Toolbar
When you've right-clicked on the tool bar, if you got down to view there's the options to edit your tool bar. The diagram below shows you what each option refers to.
Answer Grid is an excellent tool which displays every student's remote number. When they answer their number will turn black.


Save and Exit
There's a few more option on the menu. You can make the toolbar/answergrid transparent. You can save the current results, and you can exit the presentation.

The basics of a Qwizdom game

This guide will talk you through the Mission to Mars game assuming you've succesfully loaded up a Qwizdom presentation.

In a later post I shall go through a more detailed guide, but it is important to be confident with the basics first.

So you've loaded your game, and are on your intro slide. Everyone has switched on their controllers which read 'Remote #1' etc. Go onto the next slide, and the first question will be presented automatically. If there's a bit of a pause then be patient, clicking 'next slide' again will cause it to skip a question.

Your toolbar will appear at the top of the screen. Be careful not to click on the arrow on the right. It closes the toolbar and I can't work out how to open it again. I have managed it, but not sure what I did.

You will notice a figure showing the percentage of responses gathered so far, if you double click on this it will change it to a fraction:

The next icon resets the question. I don't often use this, and it's a pain if you accidently press it.

The icon with the two people on it selects a participant at random. This can be useful for sparking class discussions. Unfortunately it does sometimes pick students who got the wrong answer.

The graphs icon has many featues, and can display some of the following information. I usually freeze the screen so that i can look at this as the results come in:
This bar chart shows the correct answer in green.

This table shows everyone's responses. You can see the timings, the actual response, and their participant number.

Clicking on the games controller will finish that question, and display the winner, before automatically showing the fastest eight correct responses:
The fastest correct answer is awarded 1000 points, and each place below gets 50 points less than the one before it.
Points are still awarded for correct answers not displayed in the top 8.

Here you have four main options.
1 - Next question
2 - Shows cumulative scores
3 - Mission, shows a graphical 'race' using each participants scores
4 - Finish game

You can still look at the graphs, and responses, or return to the question.

Qwiztmas - free Maths based Qwizdom for download

A colleague and I spent an hour or so increating a special end of term Qwizdom for my high ability year 8 class, although I've used it for all group up to year 13.

It consists of 25 maths questions, and bonus cracker joke questions. The maths questions cover a wide range of topics. You will need to have Q5 or Q6 remotes because there's a number of text answer questions.

Download this for free here:
http://www.mediafire.com/?lc3lioe6crerrji

Starting up a simple Actionpoint presentation

There's a number of presentation options available for Qwizdom. To start with I'm going to show you how to run a simple car racing game, with no fancy stuff.

Before you can run a Qwizdom session you needed to plug the receiver into your USB port. When you do this it should light up.

Open up your prepared Actionpoint ready to start. If you don't have one, feel free to download my Christmas special 'Qwiztmas'.

There appears to be a bug with Qwizdom at the moment. If the Qwizdom logo is in the taskbar, then Actionpoint fails to recognise the receiver. The way round this is to right-click on the logo, and click exit:


To start up the presentation click on the icon on the far left:

After a few seconds the Presentation Setup box will appear. This allows you set customise your presentation. For now keep Participant List 'anonymous' and Save Results 'none', but change the Present As to 'Mission to Mars':

Below these drop down boxes is a set of three tabs. I recommend the following settings to start off with:
The first check box gives instant feedback to the students. They love having this, but if you have a class who shout out the right answers, remove this option, they'll soon learn not to.

The second check box isn't really suitable for the games, particularly not multiple choice questions. It allows students to change their answers after they've submitted them.

The second tab should be mainly greyed out (since you've chosen Anonymous participants), but importantly the host number should appear in the list on the right:
If this doesn't appear then you need to plug your host in, or remove the Qwizdom menu from the task bar.

Ignore the final tab, and click 'OK'.

The game will now load, and your students can turn their controllers on. The displays should read "Remote #1" etc. If they ask for the session ID simply imput your host number (probably written on the bottom of your receiver).

Creating an Actionpoint Presentation

Creating an Actionpoint Presentation
Action point is an add-in for Powerpoint. You must access it by double clicking the Actionpoint icon on the desktop, or by finding it in the Start menu.

This should automatically open up Powerpoint for you with the Actionpoint add-in loaded:

If the Add-in tab does not appear, then you need to play around with your Powerpoint options.

Creating an Actionpoint presentation is essentially the same as creating a regular Powerpoint presentation, but with a couple of additional pieces of information required.

The Opening Slide
Your first slide should be the front page to you presentation that the class will see whilst they are getting their controllers ready.

Multiple choice answers
Go to insert slide on the add-ins tab, and chose multiple choice. In my example there will be 4 answers to choose from, so I select 4 choice.
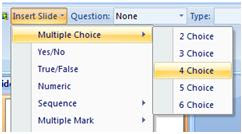
You will notice that the Question and Type boxes are now filled in:

If you wish to change the question use these drop down boxes.

You’ve now told the computer what sort of question you are asking. You now need to make the slide, and tell the computer what the correct answer is.

Create the slide in the normal way:
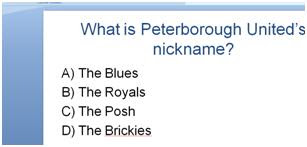
To tell the computer the correct answer click on the pencil icon:

The answer form will pop up, you just have to check the box of the correct answer, and click OK.
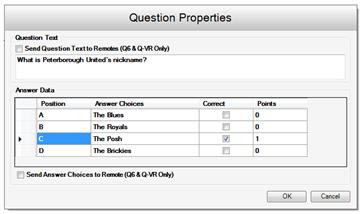
Multiple choice question completed!
For now ignore everything else. Some of the options are for the newer hardware.

Yes/No questions
Yes/No question slides are very simple. You ask a question, and the students have the option to reply with ‘Y’ or ‘N’.

As before, click Insert Slide and select Yes/No:
Again Question will display ‘Yes/No’ but this time there is no ‘type’.

Write your slide again, and remember to make it obvious to the students that it is a Yes/No question.

We now need to let the computer know the answer to your question by clicking on the pencil icon.

The Answer Form will pop up, and you just need to press the appropriate radio button:
Click OK, and your Yes/No question is complete!

True/False questions
These are identical to the Yes/No questions.

Simple Numeric answers
There can be alot more detail with the numeric answer questions. I’ll give you the basics first, then do an advanced guide.

Go through the usual process and select Numeric. A slightly smaller than usual menu will appear:

Write you question slide, and click on the pencil icon to tell the computer what the correct answer is.

A large Answer Form will appear, but you only need to but your answer into one box:

Click OK, and your simple numeric answer question slide is complete!

As you can see from the size of the Answer Form, there is alot more that can be done with numeric answers.

Sequence answers
A sequence answer question asks students to put 2-8 items in order. For example:
For this question I chose Sequence followed by 5 choice.

Click on the pencil icon as normal and the Answer Form will pop up. Just put the correct order in the boxes (must be numbers, not letters):

To get the question right the student must put them all in the correct order. Ignore the check box, and click OK.

Sequence question complete!

An introduction

I teach Maths at a large secondary school in Peterborough having trained at the University of Sheffield. During my time in Sheffield I was introduced to Qwizdom, and interactive voting system that has uses in the classroom.

I was very keen to use Qwizdom in my lessons having experienced a couple of demonstration sessions at university, but I struggled to find anyone who was able to help me with it. I discovered that my placement school had a set (completely unused) and decided that i would have to work it all out myself from scratch. In the two years since I have learnt alot about Qwizdom, and would like to share my experiences with other teachers, and hopefully share resources.

Qwizdom is incredibly easy to use, and the more often you use it, the more confident you will be with it. The more confident you are, thn the more features you'll be able to use.

At the moment I am using the Q5 remotes:
I am however using the latest update (available to download here) which can be used for the Q6 remotes.